Creating your first flower bed might seem overwhelming, but here’s the truth: anyone can design a beautiful garden space that enhances their home’s curb appeal. Whether you’re working with a small front yard border or planning a larger backyard display, learning how to make a flower bed offers an accessible way to add color, texture, and natural beauty to your landscape.
This comprehensive guide will walk you through every step of the process to landscaping beds, from initial planning and soil preparation to plant selection and ongoing maintenance. You’ll discover proven techniques used by professional landscapers, learn to avoid common beginner mistakes, and gain the confidence to create flower beds that thrive throughout the seasons.
Ready to get started? By the end of this guide, you’ll have all the knowledge needed to transform any outdoor space into a vibrant, welcoming garden that brings joy year after year. Let’s dive into making a flower garden that you’ll be proud to show off!
Planning your first flower bed
Choosing the perfect location
Before you start digging, you need to pick the right spot. Think of this as the foundation for your success with easy flower beds for beginners.
- Sunlight requirements play a huge role in plant health. Spend a few days observing how sunlight moves across your yard. Most flowering plants need at least 6 hours of direct sunlight daily, though some shade-loving varieties can thrive with less. Mark areas that receive full sun, partial shade, and full shade throughout the day.
- Drainage considerations matter more than you might think. After a rainstorm, check where water pools in your yard. Avoid these spots for your flower bed, or plan to improve drainage before planting. Good drainage prevents root rot and keeps your plants healthy.
- Accessibility should guide your location choice too. Can you easily reach all parts of the bed for watering, weeding, and deadheading? If you’re starting a flower bed near a walkway or driveway, you’ll find maintenance much easier than tucking it into a far corner of your property.
- Visual impact matters when you’re creating a new flower bed. Where will you see your flower bed most often? From your front door? Your kitchen window? Choose a location where you’ll actually enjoy the view you’re working so hard to create.
Determining size and shape
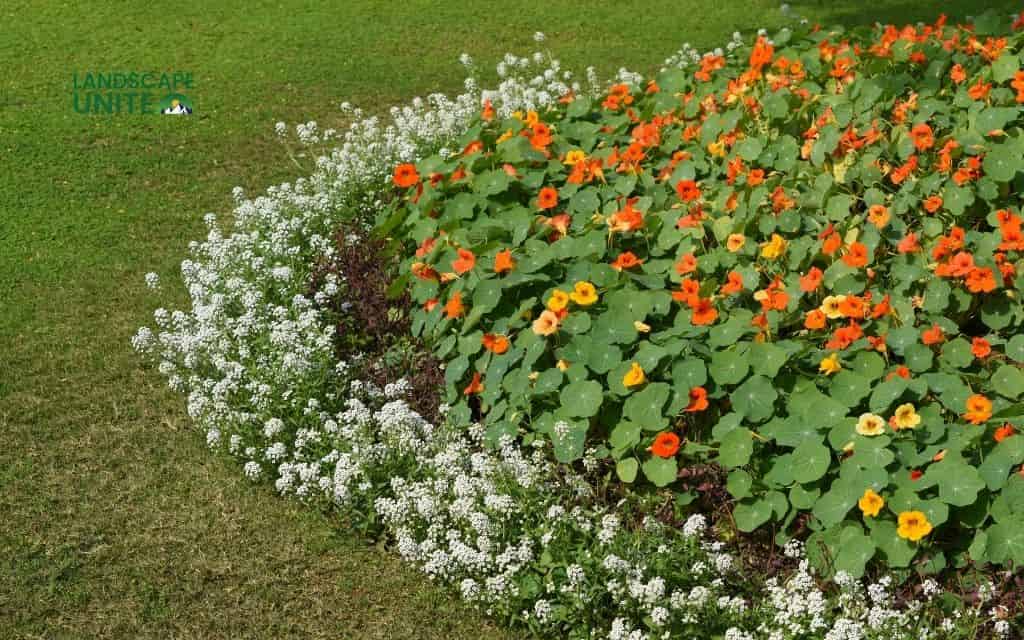
How do you make a flower bed the right size? Start smaller than you think you need. A well-maintained simple flower bed of 20-30 square feet looks far better than an overgrown 100-square-foot space you can’t keep up with.
Proportional guidelines help create visual balance. A good rule of thumb: your flower bed should be at least half as wide as it is long. For front yards, beds that are 3-4 feet deep work well along foundation plantings. Deeper beds of 5-6 feet give you more design flexibility for layering plants by height.
Popular shapes for beginners include:
- Curved beds with gentle, flowing lines that follow natural contours
- Simple rectangular beds along fences or property lines
- Island beds that create focal points in open lawn areas
- Corner beds that soften hard edges of structures
Budget considerations should influence your initial size too. You can always expand your flower bed next season as your skills and budget grow. This approach also spreads costs over time, making the project more manageable.
Understanding your growing zone
Your USDA Hardiness Zone determines which plants will survive winters in your area. Find your zone by checking the USDA Plant Hardiness Zone Map online. This information is crucial when you’re deciding what flowers to plant in flower beds for beginners.
Local climate considerations extend beyond your hardiness zone. Does your area experience late spring frosts? Extended summer drought? Heavy clay soil? These factors influence both plant selection and timing for how to make a new flower bed.
Seasonal timing varies by region. Generally, spring after the last frost date and early fall provide ideal conditions for starting a flower bed. These periods give plants time to establish roots before facing extreme weather. Your local garden center can provide specific timing recommendations for your area.
Weather patterns like wind exposure, humidity levels, and rainfall amounts all impact plant performance. Native plants and those adapted to your specific conditions will require less maintenance and thrive with minimal intervention.
Essential soil preparation techniques
Testing and improving your soil
Great soil creates great gardens. Before you build a flower bed, you need to understand what you’re working with.
- Simple soil testing starts with a basic squeeze test. Grab a handful of moist soil and squeeze it. Does it hold together in a ball but crumble when poked? Perfect! If it stays in a tight ball, you have heavy clay. If it falls apart immediately, you have sandy soil.
- For more detailed information, purchase an inexpensive soil test kit from any garden center or submit samples to your local extension office. These tests reveal pH levels and nutrient content, giving you specific guidance on what amendments your soil needs.
- pH levels matter because they affect nutrient availability. Most flowering plants prefer slightly acidic to neutral soil (pH 6.0-7.0). If your soil is too acidic, add lime. If it’s too alkaline, incorporate sulfur or peat moss.
- Drainage assessment takes just minutes. Dig a hole about 12 inches deep and fill it with water. If water remains after 4 hours, you have drainage issues. Raised beds, French drains, or incorporating sand and compost can improve drainage dramatically.
- Organic matter incorporation improves virtually any soil type. Add 2-4 inches of compost, aged manure, or leaf mold to your bed. This single step improves drainage in clay soils, increases water retention in sandy soils, and provides nutrients for plant growth. Think of compost as the secret ingredient that makes everything work better.
The no-dig method for beginners
Want to know how to create a new flower bed from scratch without breaking your back? The no-dig method is revolutionizing traditional bed preparation and it’s perfect for beginners.
- Cardboard layering forms the foundation of this technique. Lay cardboard directly over grass or weeds where you want your new bed. Overlap pieces by several inches to prevent gaps. This layer smothers existing vegetation while creating a barrier that eventually breaks down, adding organic matter to your soil.
- Compost and mulch application comes next. Spread 4-6 inches of quality compost directly on the cardboard, followed by 2-3 inches of mulch. This creates an instant planting bed. You can plant immediately by cutting small holes through the cardboard, or wait 4-6 weeks for the cardboard to begin decomposing.
- Time-saving benefits make this method attractive for busy homeowners. You skip the exhausting work of removing sod, tilling, and fighting stubborn grass roots. The entire process takes a fraction of the time compared to traditional methods.
- Environmental advantages include preserving soil structure, protecting beneficial microorganisms, and sequestering carbon. You’re working with nature rather than against it, creating healthier soil over time.
Traditional soil preparation
Sometimes you need to dig. If you’re dealing with severely compacted soil, extensive weed problems, or want to adjust your bed’s grade, traditional soil preparation might be your best approach.
- When to dig versus using no-dig methods depends on your specific situation. Dig when you need to remove rocks, improve severely compacted areas, or level uneven ground. Choose no-dig methods when working with decent existing soil or covering grass.
- Proper tilling techniques prevent common problems. Remove the top 6-8 inches of sod and set aside. Break up the underlying soil to a depth of 12 inches. Mix in 3-4 inches of compost thoroughly. Avoid over-tilling, which destroys soil structure and brings dormant weed seeds to the surface.
- Amendment mixing ratios vary by soil type. For clay soil, add equal parts compost and sand. For sandy soil, focus on compost only. For average loam, 25-30% compost by volume provides excellent results. These ratios create ideal growing conditions for most flowering plants.
- Seasonal timing impacts success. Prepare beds in fall for spring planting when possible. This gives amendments time to integrate and organic matter time to decompose. Spring preparation works too, just allow 2-3 weeks between preparation and planting for soil to settle.
Beginner-friendly plant selection
Annual vs. perennial flowers
Understanding the difference between annuals and perennials helps you make smart choices when making flower beds.
Annuals like marigolds, petunias, and impatiens complete their entire life cycle in one growing season. They provide instant color and continuous blooms from planting until frost. You’ll replant them each year, but they offer maximum impact for minimal long-term commitment.
Perennials such as black-eyed Susan, purple coneflower, and daylilies return year after year. They follow what gardeners call the “3-year rule” for flower bed development. The first year they sleep (focusing on root development), the second year they creep (modest growth and flowering), and the third year they leap (reaching full mature size and bloom potential). This patience pays off with years of beauty from a single investment.
Cost-benefit analysis reveals interesting insights. While annuals cost less initially, perennials become more economical over time. A strategic mix provides immediate gratification from annuals while perennials establish themselves. Many successful flower bed designs for beginners incorporate 60% perennials and 40% annuals.
Mixing strategies create continuous color and interest. Use perennials as your backbone plants that provide structure and reliable seasonal displays. Fill gaps with annuals for extra pops of color and to cover bare spots while perennials mature.
Top 10 foolproof flowers for beginners
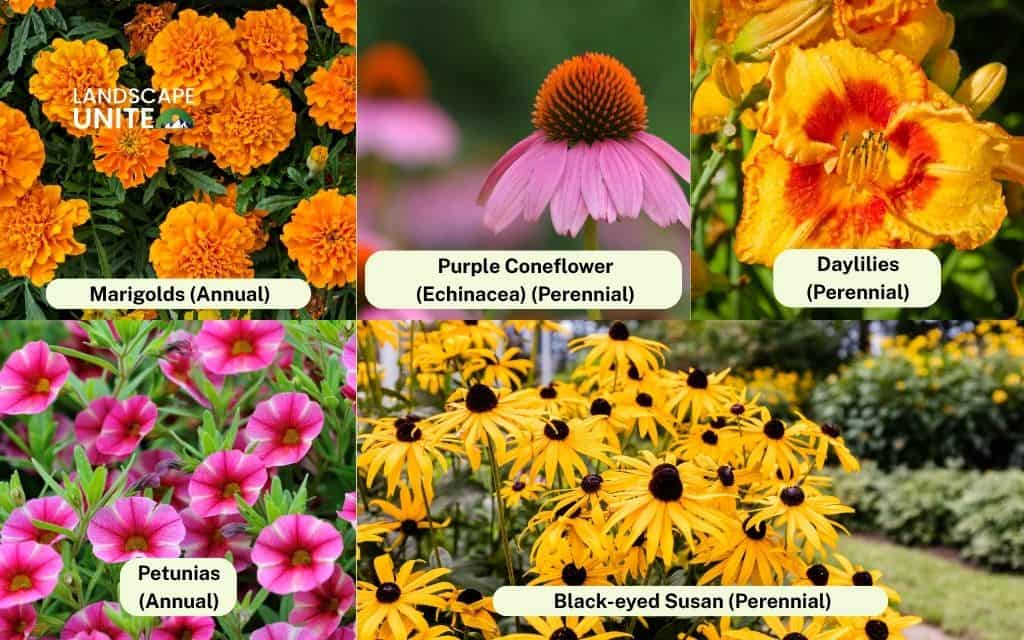
Not all plants forgive beginner mistakes equally. These reliable performers tolerate inconsistent watering, varying soil conditions, and general neglect better than most. Here are the top 10 flowers that guarantee success when making flower beds as a beginner:
1. Marigolds (Annual)
Marigolds rank as the ultimate beginner flower. They thrive in full sun with minimal water, blooming continuously from late spring until the first hard frost. These cheerful flowers come in shades of yellow, orange, and red, reaching heights of 6-36 inches depending on variety. Plant them 8-10 inches apart for best results.
What makes marigolds special? They actually deter certain garden pests like aphids and whiteflies through their distinctive scent. This companion planting benefit protects neighboring plants naturally. Deadheading spent blooms encourages more flowers, though even neglected marigolds continue blooming. They tolerate poor soil, heat, and humidity with ease. Perfect for simple flower bed designs where you want guaranteed color.
2. Black-eyed Susan (Perennial)
Black-eyed Susans deliver cheerful golden yellow petals with dark centers that brighten any flower bed from mid-summer through fall. These native North American wildflowers tolerate heat, drought, and poor soil better than most perennials. They grow 2-3 feet tall and spread 12-18 inches wide.
Once established, black-eyed Susans require almost no maintenance. They resist deer browsing and attract butterflies and beneficial pollinators to your garden. These reliable perennials self-seed gently, gradually expanding your display without becoming invasive. Cut back dead foliage in early spring and divide clumps every 3-4 years to maintain vigor. They’re perfect for beginner flower garden plants that deliver years of beauty.
3. Purple Coneflower (Echinacea) (Perennial)
Purple coneflowers provide months of blooms from early summer through fall, featuring distinctive spiky centers surrounded by purple, pink, or white petals. These tough perennials grow 2-4 feet tall and handle drought, heat, and poor soil with impressive resilience.
Beyond their beauty, purple coneflowers serve important ecological functions. They attract butterflies, bees, and goldfinches who love the seed heads in fall and winter. Leave spent flowers standing through winter to provide food for birds and visual interest. These low-maintenance perennials rarely suffer from pest or disease problems. Water regularly during their first season, then they essentially care for themselves. Excellent choice for easy flower beds for beginners who want sustainable, wildlife-friendly gardens.
4. Daylilies (Perennial)
Daylilies practically grow themselves, making them perfect for absolute beginners. Each trumpet-shaped bloom lasts just one day, but plants produce so many buds that flowering continues for weeks. Available in virtually every color except true blue, daylilies adapt to full sun or partial shade and tolerate various soil types.
These versatile perennials grow 1-4 feet tall depending on variety. Plant them 18-24 inches apart and watch them spread into impressive clumps over 2-3 years. Daylilies handle drought once established, though regular watering produces more blooms. They resist most pests and diseases naturally. Divide crowded clumps every 3-5 years to maintain flowering performance. Their grass-like foliage provides attractive texture even when plants aren’t blooming.
5. Petunias (Annual)
Petunias offer vibrant colors in various forms from trailing to upright, perfect for flower bed small spaces or large displays. These versatile annuals bloom from spring until frost in shades of purple, pink, red, white, and yellow. Modern varieties require minimal deadheading and tolerate heat better than older types.
Plant petunias 12 inches apart in full sun for best performance, though they tolerate partial shade. Regular watering keeps them blooming prolifically. Wave and Supertunia varieties spread 2-3 feet, making excellent groundcovers for larger beds. Traditional grandiflora types grow upright to 12-15 inches. Feed monthly with balanced fertilizer for continuous blooms. These reliable annuals handle summer heat and occasional neglect surprisingly well for such showy flowers.
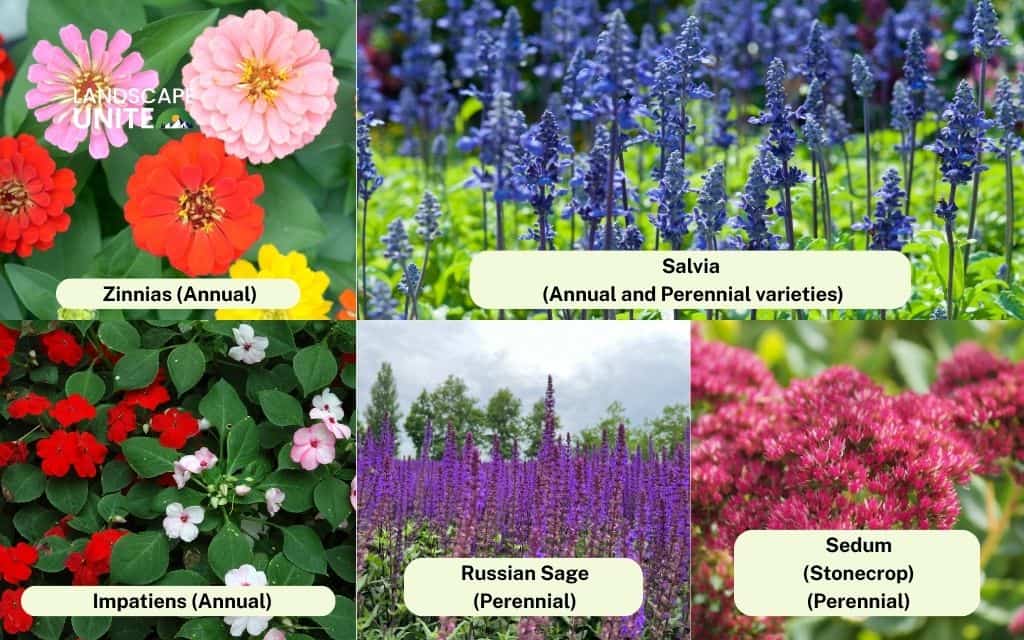
6. Zinnias (Annual)
Zinnias deliver maximum color for minimum effort, making them ideal for starting a flower bed from seed. These heat-loving annuals bloom in every color except blue, with flowers ranging from 1-6 inches across. They grow 6-40 inches tall depending on variety, providing options for front, middle, or back of borders.
Direct-seed zinnias after danger of frost passes and soil warms. They germinate in 5-7 days and bloom within 60 days. Zinnias thrive in hot, sunny locations where other flowers struggle. Deadhead regularly to encourage more blooms and prevent powdery mildew. These annuals attract butterflies and make excellent cut flowers. Plant new seeds every 2-3 weeks for continuous blooms through fall. Their foolproof nature makes them perfect for teaching kids about gardening.
7. Salvia (Annual and Perennial varieties)
Salvias provide vertical interest with spiky flower clusters in shades of blue, purple, red, pink, and white. Annual varieties like scarlet sage bloom continuously from late spring through frost. Perennial types return reliably each year in appropriate hardiness zones.
These drought-tolerant plants grow 12-36 inches tall depending on variety. Hummingbirds and butterflies visit salvias frequently, adding movement and life to your flower bed design. Plant them 12-15 inches apart in full sun. Salvias handle heat, humidity, and occasional dry spells without complaint. Their long bloom period and low maintenance needs make them valuable additions when you’re learning how to make a flower bed. Deadheading spent flower spikes encourages reblooming in many varieties.
8. Impatiens (Annual)
Impatiens excel in shady areas where other flowers struggle, providing reliable color in challenging spots. These shade-loving annuals bloom continuously in shades of pink, red, white, orange, and purple from spring until frost. They grow 6-24 inches tall depending on variety.
Plant impatiens 10-12 inches apart in partial to full shade with rich, moisture-retentive soil. Unlike most flowers, impatiens actually prefer shade and struggle in full sun. Keep soil consistently moist for best performance. Modern varieties resist the downy mildew that plagued older types. These self-cleaning flowers drop spent blooms automatically, requiring no deadheading. Perfect for brightening shady foundation plantings or woodland garden settings where sunny options fail.
9. Russian Sage (Perennial)
Russian sage offers airy purple blooms and aromatic silver-gray foliage with virtually no care required. This tough perennial blooms from mid-summer through fall, growing 3-5 feet tall and 2-3 feet wide. Its fine texture contrasts beautifully with bolder-leaved plants.
Plant Russian sage in full sun with excellent drainage. Once established, it handles extreme heat, drought, and poor soil effortlessly. Deer and rabbits avoid this aromatic plant. Cut stems back to 6-8 inches in early spring before new growth emerges. Russian sage needs dividing only every 8-10 years. Its long bloom period, drought tolerance, and pest resistance make it invaluable for low-maintenance flower beds. The silvery foliage provides interest even before blooms appear.
10. Sedum (Stonecrop) (Perennial)
Sedums provide interest from spring through fall with succulent leaves and autumn flowers. These ultimate low-maintenance perennials handle neglect, drought, poor soil, and extreme heat without complaint. Upright varieties grow 12-24 inches tall, while creeping types spread along the ground.
Tall sedums like ‘Autumn Joy’ feature thick, fleshy leaves and flat flower clusters that attract butterflies in late summer and fall. Flowers emerge green, transition to pink or red, and fade to rusty bronze, providing months of changing color. These tough perennials need full sun and excellent drainage. Water sparingly, as overwatering causes more problems than drought. Divide clumps every 4-5 years if desired, though sedums thrive for decades without division. Their succulent nature makes them perfect for beginner flower garden plants in challenging, dry locations.
Care requirements for all 10 plants
These beginner-friendly flowers share similar basic needs. Most require regular watering during establishment (first 6-8 weeks after planting), then become more self-sufficient. Occasional deadheading encourages more blooms in most varieties. Annual cleanup in fall or early spring keeps beds tidy. These reliable performers resist most common pests and diseases naturally, eliminating the need for chemical treatments. Their forgiving nature makes them perfect choices when you’re learning how to create a new flower bed from scratch.
Color theory and design principles
Want your flower bed to look professionally designed? Apply these simple principles that landscape designers use.
- The Rule of Three creates natural, balanced visual appeal. Plant in groups of three, five, or seven rather than single specimens. Odd numbers feel more organic and pleasing to the eye than even numbers. This principle works at multiple scales, from individual plant groupings to overall bed design with three different plant varieties.
- Warm versus cool color combinations affect how we perceive space. Warm colors (red, orange, yellow) appear to advance, making spaces feel closer and more energetic. Cool colors (blue, purple, white) recede visually, creating depth and calm. Use warm colors in distant areas to bring them closer, and cool colors in small spaces to make them feel larger.
- Height and texture layering adds depth and interest. Follow the landscape design basics: tall plants in back (or center for island beds), medium plants in the middle, and short plants in front. Mix leaf textures and shapes for added interest. Combine spiky plants with mounded forms and trailing varieties for dynamic contrast.
- Seasonal succession planning ensures your bed looks good beyond a single season. Choose plants that bloom at different times. Spring bulbs, early summer perennials, mid-summer annuals, and fall bloomers create a garden that evolves and provides continuous interest from March through October.
Step-by-step flower bed creation
Layout and design process
How do you make a flower garden that flows naturally? Start with a solid plan.
- Sketching your plan doesn’t require artistic talent. Draw a simple overhead view of your bed on graph paper. Mark dimensions, sun exposure, and existing features like trees or structures. Sketch in plant placements using circles sized to represent mature plant width.
- The garden hose method translates your sketch to reality. Lay a garden hose along the ground to outline curved bed edges. Step back and view from multiple angles. Adjust until the shape feels right. This flexible approach lets you visualize the actual footprint before cutting into turf.
- Plant spacing calculations prevent overcrowding. Check plant tags for mature spread and space accordingly. Yes, your new bed will look sparse initially, but resist the temptation to crowd plants. They’ll fill in faster than you expect. Use annuals to temporarily fill gaps between establishing perennials.
- Traffic flow considerations matter more than most beginners realize. Leave space to access plants without stepping on soil. Consider installing stepping stones or a small path if your bed exceeds 3 feet in depth. This prevents soil compaction and makes maintenance enjoyable rather than frustrating.
Installation day guide
Everything you’ve learned comes together when you build a flower bed and install your plants.
- Best planting times vary by plant type. Install container-grown perennials anytime during the growing season, though spring and fall provide ideal conditions. Plant annuals after all frost danger passes in spring. Fall planting works wonderfully for perennials, giving them months to establish roots before next summer’s heat.
- Proper planting techniques ensure success. Dig holes twice as wide but no deeper than the root ball. Gently loosen roots if they’re circling the container. Place plants at the same depth they grew in their containers. Backfill with native soil mixed with compost, firming gently to eliminate air pockets.
- Watering establishment protocol is critical during the first weeks. Water immediately after planting until soil is thoroughly moist. Continue watering daily for the first week, then gradually reduce frequency as plants establish. Deep, infrequent watering encourages deep root growth better than frequent shallow watering.
- Initial mulching application completes your installation. Spread 2-3 inches of organic mulch around plants, keeping it 2-3 inches away from stems to prevent rot. Mulch conserves moisture, moderates soil temperature, suppresses weeds, and gives your bed a finished appearance.
Edging and finishing touches
Professional-looking beds need clean edges that define the space and prevent grass encroachment.
Edging material options range from simple to elaborate:
- Natural edge: Cut a clean line with a spade and maintain regularly
- Plastic or metal edging: Affordable and functional though less decorative
- Stone or brick: More expensive but provides permanent, attractive borders
- Decorative pavers: Create formal, defined edges with architectural interest
Installation techniques vary by material. For natural edges, use a sharp spade to cut a V-shaped trench 4-6 inches deep along your bed line. For manufactured edging, follow product instructions for proper depth and anchoring. For stone or brick, excavate a shallow trench and set materials level using sand as needed.
Weed barrier considerations divide gardeners. Landscape fabric under mulch can prevent weed growth initially, but over time it interferes with natural mulch decomposition and makes bed renovation difficult. Most professional landscapers now skip fabric, relying instead on thick mulch layers and regular maintenance.
Final aesthetic enhancements pull everything together. Add decorative elements like large rocks as focal points, incorporate garden art sparingly, or install solar lights to illuminate evening displays. These touches transform a simple flower bed into a complete outdoor feature.
Maintenance made simple
Seasonal care calendar
Successful flower bed maintenance follows natural rhythms throughout the year.
Spring preparation tasks kick off the growing season:
- Remove winter mulch or debris as plants emerge
- Cut back dead perennial foliage from last season
- Edge beds and refresh mulch layers
- Divide overcrowded perennials every 3-4 years
- Apply slow-release fertilizer as new growth appears
Summer maintenance routine keeps beds looking their best:
- Water deeply during dry periods, preferably early morning
- Deadhead spent blooms to encourage continued flowering
- Monitor for pests and address problems promptly
- Pull weeds while small and soil is moist
- Add annuals to fill gaps or provide color bursts
Fall cleanup and preparation sets the stage for next year:
- Remove spent annuals after frost
- Cut back most perennials to 3-4 inches (leave ornamental grasses for winter interest)
- Apply 1-2 inches of fresh compost as a soil amendment
- Plant spring bulbs for early season color
- Take photos to remember what worked and what didn’t
Winter protection strategies help plants survive cold:
- Apply 3-4 inches of mulch around tender perennials after the ground freezes
- Water evergreen plants well before ground freezes
- Protect marginally hardy plants with burlap windbreaks
- Remove heavy snow from shrubs to prevent breakage
Watering and fertilizing basics
Understanding plant water and nutrient needs prevents both waste and plant stress.
Proper watering techniques make a significant difference. Water deeply but less frequently to encourage deep root growth. Most established flower beds need 1 inch of water weekly from rain or irrigation. Stick your finger 2-3 inches into soil. If it’s dry, water. If moist, wait.
Drip irrigation benefits include water conservation and improved plant health. Modern drip systems can reduce water usage by up to 50% compared to traditional overhead watering methods. They deliver water directly to root zones, reducing waste from evaporation and runoff. Consider installing a basic drip system with a timer for effortless maintenance.
Fertilizing schedules keep plants vigorous without overfeeding. Apply a balanced slow-release fertilizer in early spring as growth begins. Many perennials need no additional feeding. Annuals benefit from monthly liquid fertilizer applications during the growing season. Always follow product directions, as more fertilizer doesn’t mean better growth.
Signs of over or under-watering help you adjust your routine:
- Overwatering: Yellowing leaves, soggy soil, fungal growth, wilting despite wet soil
- Under-watering: Dry, crispy leaves, wilting that improves after watering, stunted growth, flower drop
Pest and disease prevention
Prevention beats treatment every time when dealing with garden problems.
Common issues identification starts with regular observation. Check plants weekly for unusual spots on leaves, holes from chewing insects, powdery coatings, or wilting. Early detection allows for easier management before problems spread.
Organic treatment options provide effective solutions without harsh chemicals:
- Handpicking larger insects like beetles and caterpillars
- Spraying aphids and mites with strong water jets
- Using insecticidal soap for soft-bodied pests
- Applying neem oil for various fungal problems
- Creating barriers with diatomaceous earth around susceptible plants
Companion planting benefits naturally deter certain pests. Marigolds repel aphids and whiteflies. Lavender discourages moths and fleas. Planting these beneficial flowers throughout your bed can reduce pest pressure naturally. This principle applies to vegetable gardens too, where flowers attract beneficial insects that prey on harmful ones.
When to call professionals becomes necessary for persistent problems, disease identification uncertainties, or when organic methods fail. Sometimes professional expertise saves time, money, and your plants. For personalized guidance on challenging landscape issues, connecting with gardening professionals can provide solutions tailored to your specific situation.
Common beginner mistakes to avoid
Planning and design errors
Learning from others’ mistakes saves you time, money, and frustration.
- Overcrowding plants ranks as the number one beginner error. Those small plants at the garden center will grow, sometimes dramatically. Follow spacing recommendations even though your bed looks sparse initially. Crowded plants compete for resources, suffer from poor air circulation, and become susceptible to disease.
- Ignoring mature plant sizes leads to maintenance nightmares later. That cute little shrub might grow 8 feet tall and 6 feet wide. Research mature sizes before planting and plan accordingly. Consider both height and spread to avoid plants growing over walkways or blocking windows.
- Poor location selection dooms plants from the start. Planting sun-lovers in shade or shade-lovers in blazing sun creates constant struggles. Match plants to site conditions rather than trying to force plants to adapt to inappropriate locations.
- Inadequate soil preparation causes long-term problems. Skipping this crucial step means your plants struggle to establish, require excessive water and fertilizer, and remain vulnerable to stress. Invest time in proper flower bed preparation, and you’ll enjoy years of easier maintenance.
Plant selection mistakes
Choosing the wrong plants wastes money and creates frustration.
- Choosing wrong plants for conditions happens when gardeners fall in love with plants unsuited to their zones or microclimates. That gorgeous tropical plant won’t survive your winters. Those alpine plants struggle in humid climates. Stick with plants adapted to your specific growing conditions for the easiest success.
- Mixing incompatible plants creates care challenges. Drought-tolerant plants paired with water-loving varieties force you to compromise on watering, leaving someone unhappy. Group plants with similar water, light, and soil preferences together.
- Seasonal timing errors undermine establishment. Planting tender annuals too early leads to frost damage. Installing perennials in mid-summer heat creates unnecessary stress. Follow timing recommendations for your area for best results.
- Budget allocation problems often mean spending too much on plants and too little on soil amendments. A modest plant in great soil outperforms an expensive specimen in poor soil every time. Allocate at least one-third of your budget to proper soil preparation.
Maintenance oversights
Small maintenance tasks prevented become big problems later.
- Inconsistent watering stresses plants and reduces flowering. Establish a regular watering schedule during plants’ first season. After establishment, most beds need attention only during dry spells.
- Neglecting deadheading reduces bloom production in many plants. Spending 10 minutes weekly removing spent flowers encourages plants to produce more blooms rather than setting seed. This simple task extends flowering seasons significantly.
- Skipping mulch renewal allows weeds to establish and moisture to evaporate. Replenish mulch annually, maintaining 2-3 inches depth. This simple step dramatically reduces maintenance time over the growing season.
- Ignoring early problem signs allows small issues to become major problems. Address yellowing leaves, unusual spots, or pest presence immediately. Prevention and early intervention work far better than fighting established problems.
Budget-friendly tips and tricks
Cost-saving strategies
Beautiful flower beds don’t require huge budgets when you’re strategic about spending.
- Starting from seeds versus transplants offers significant savings. Seeds cost a fraction of started plants, though they require more time and attention. Start easy annuals like marigolds and zinnias from seed. Invest in transplants for perennials you want to establish quickly.
- Plant swapping communities exist in many areas through social media groups, garden clubs, and community gardens. Gardeners regularly divide perennials and share extras. This wonderful tradition provides free plants while connecting you with experienced local gardeners who offer valuable advice.
- DIY soil amendments reduce costs dramatically. Create your own compost from kitchen scraps and yard waste. Collect fall leaves from neighbors (they’re often happy to have you take them) for free mulch. Ask local tree services about free wood chips. These free or low-cost amendments work as well as expensive bagged products.
- Seasonal nursery sales timing helps stretch budgets. Shop end-of-season sales in fall for perennials at 50-75% off. These plants establish beautifully in fall and return in spring. Spring clearance sales after Mother’s Day often feature overstocked annuals at deep discounts.
Long-term investment planning
Smart spending now pays dividends for years.
- Perennial versus annual cost analysis reveals interesting math. Ten annual plants at $3 each cost $30 yearly. Five perennial plants at $15 each cost $75 initially but return for 10+ years. Over five years, perennials cost $75 while annuals cost $150. This doesn’t mean skipping annuals entirely, but favoring perennials for the bulk of your plantings makes financial sense.
- Tool investment priorities should focus on quality basics rather than gadgets. A good spade, garden fork, hand trowel, and bypass pruners will serve you for decades. Add specialized tools as needs arise. Quality tools cost more initially but last far longer than cheap alternatives.
- Maintenance cost considerations extend beyond installation. Well-designed flower beds using appropriate plants require minimal ongoing investment. Poor designs demand constant inputs of water, fertilizer, pest control, and plant replacement. Invest time in proper design and preparation to minimize long-term costs.
- Property value benefits make flower beds genuine investments. Well-designed, mature landscape plantings can improve property values by up to 15% when professionally planned and maintained. Even simple flower beds significantly enhance curb appeal, creating positive first impressions for visitors and potential buyers.
FAQs about flower beds for beginners
What’s the best time of year to start a flower bed?
Spring after your area’s last frost date and early fall provide ideal conditions for most regions. These periods give plants time to establish strong root systems before facing extreme weather conditions. Spring planting offers immediate gratification with blooms throughout summer, while fall planting allows perennials months to establish before next year’s growing season begins.
How long does it take for a flower bed to look established?
Annual flowers provide immediate color within weeks of planting. Perennials follow the “3-year rule” of landscape development: they sleep the first year (focusing on root establishment), creep the second year (modest growth and flowering), and leap by the third year (reaching full mature size and bloom potential). This patience pays off with years of beauty from your initial investment.
What flowers require the least maintenance for beginners?
Marigolds, black-eyed Susans, purple coneflowers, and daylilies rank among the most forgiving flowering plants. These reliable performers tolerate inconsistent watering, adapt to various soil conditions, resist common pests and diseases, and require minimal care once established. They’re perfect choices for your first flower bed project.
How often should I water my new flower bed?
During the first 6-8 weeks after planting, water daily to establish strong roots. After establishment, most flower beds need about 1 inch of water weekly from rain or irrigation. Deep, infrequent watering encourages deeper root growth compared to frequent shallow watering. Check soil moisture 2-3 inches deep to determine when watering is needed.
What’s the difference between annual and perennial flowers?
Annuals complete their entire life cycle in one growing season, providing continuous blooms from planting until frost but requiring replanting each year. Perennials return year after year, though most bloom for shorter periods. A strategic mix of 60% perennials and 40% annuals creates beds with reliable structure plus continuous seasonal color.
Conclusion
You’ve learned everything needed to create beautiful flower beds for beginners. The planning strategies, soil preparation techniques, plant selection guidelines, and maintenance basics all work together to help you succeed.
Don’t let another growing season pass without starting your flower bed. Begin with a small, manageable area and apply these techniques. Remember, every expert gardener started exactly where you are now. The most important step is simply getting started.
Pick a weekend this month to mark out your bed location using the garden hose method. Visit your local garden center with your plant list based on your sun exposure and soil conditions. Start preparing your soil using either the no-dig or traditional method that fits your situation. Before you know it, you’ll be enjoying the beautiful blooms you created.
